
Click for the english version
¿Acaso no aman a esa gente súper ingeniosa que te responde así?:
– ¿Me regalas un vaso de agua?
– No tengo vasos de agua, pero te puedo dar un vaso con agua.
¿No los aman? ¿No? Yo tampoco. Se creen muy inteligentes y muy chistosos. Pero no.
Cuando uno dice “Un vaso de agua”, se está usando una cantidad (muy ambigua) de medición de volumen. No se dice “Un litro con agua” sino “un litro de agua”. Bueno. Con los vasos es lo mismo.
¿A qué viene todo ésto? Pues, a que ésta canasta de pan, realmente es una canasta hecha de pan. De ahí, pues… No, mi introducción no tiene nada que ver.
La historia tras éste post es bastante sencilla. Hace unos días, en Pinterest, encontré un Pin de 25 ideas para canastas de regalos, y bueno, aunque no me encantaron las ideas de dichas canastas, realmente me dieron ganas de darle a alguien una canasta de regalos. El problemas es la canasta. Yo no trabajo, por lo tanto dependo del dinero que mis padres me dan, así que no pienso comprar una canasta. Sale más barato hacerla con harina.
Ésta receta viene del post que hay en Namiotl. Ésta es una traducción del original, que está en polaco. No se ustedes, pero yo no hablo polaco. Así que, a menos que de verdad les interese, yo me quedaría con la receta que hay en éste blog, porque la traducción es de Google translate, y es algo mala.
Aquí está la imagen original.
La masa puede hacerse a mano o en batidora. Yo la hago en batidora porque eso de la panadería a mano no se me dan tan bien como yo quisiera.
Canasta de pan
Ingredientes
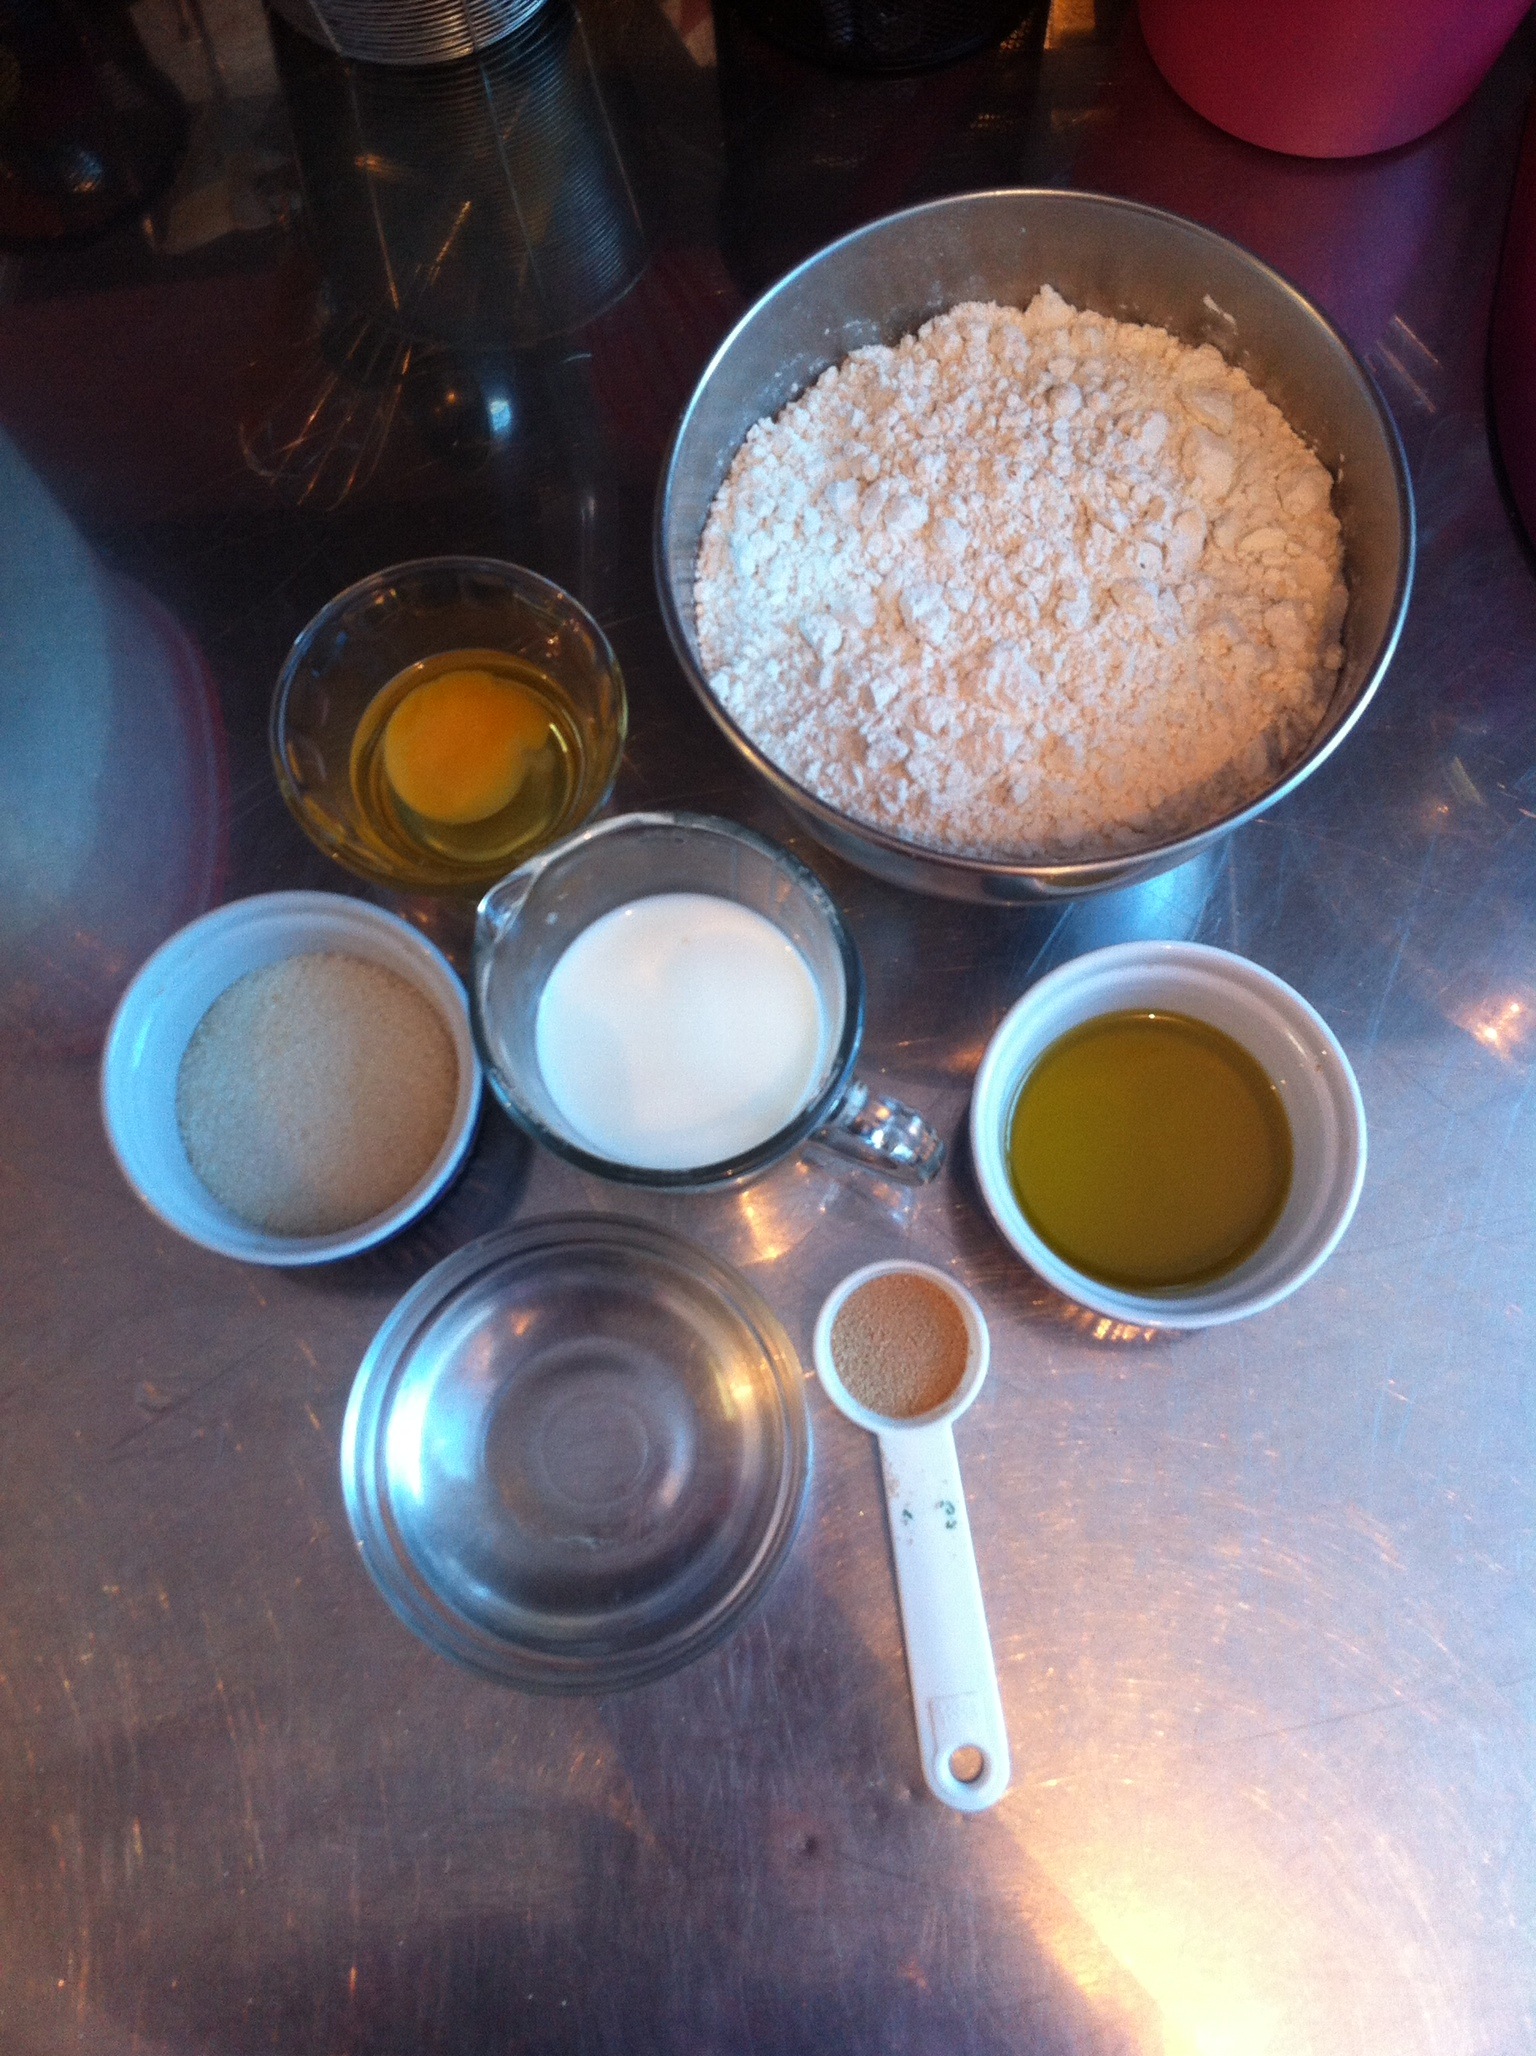
- 4 tazas de harina (si la masa se pega mucho, agregar 1/2 taza más)
- 1 huevo
- 1 cucharada de levadura seca
- 1/2 taza de agua tibia
- 1/2 taza de leche
- 1/4 de taza de azúcar
- 1/4 de taza de aceite de oliva
- 1 huevo para barnizar
- 1/2 cucharadita de sal
Preparación
1.- Mezclar 1 cucharada de azúcar con el agua, disolver y agregar la levadura. Dejar reposar un par de minutos.
El agua debe estar entre 30 y 60°C, para activar la levadura. Si está más fría, la levadura no se activa. Si está más caliente, la levadura muere. Aquí hay un tip, si tocas el agua, y en algún momento es doloroso, el agua está muy caliente. Y pues… si se siente fría, está fría.

Así se ve la levadura cuando se activa ^u^
2.- Mezclar el resto del azúcar con harina y sal.
3.- Agregar la mezcla de levadura, mezclar.
4.- Agregar el huevo y la leche. Incorporar perfectamente.
5.- Agregar aceite de oliva y amasar durante unos minutos, hasta que la masa esté lisa y tersa.
Tratándose de otros panes, yo recomendaría agregar más leche (o el líquido usado en el pan) para que la masa estuviera lo mejor hidratada posible, pero en éste caso, sirve que la masa sea un poco más seca, para que la canasta sea más consistente, y no tan ligera.
6.- Aceitar un bol con aceite (válgame la redundancia) de oliva. Cubrir la parte de arriba de la masa con aceite para que no haga costra. Dejar la masa reposando en un lugar cálido sin corrientes de aire (microondas u horno, apagado, obviamente), hasta que doble su volumen (de una a dos horas).

Primero -.-

Después :O
Oh, si. Ahora viene lo divertido.
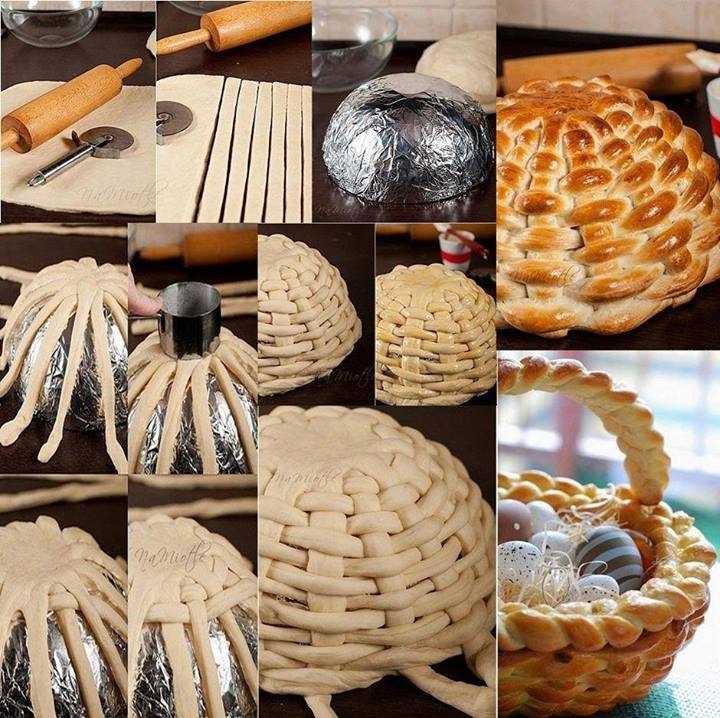
Primero que nada, en el post original, usan un bol de vidrio apto para horno. Son los que están hechos de vidrio Pyrex. Se cubre con aluminio y se usa sin problemas, pero claro, yo soy súper lista y usé uno de los moldes de Wilton para hornear pasteles en forma de media esfera, engrasado y enharinado. Si me lo preguntan, creo que el bol de vidrio forrado de aluminio es una mejor idea. A la hora de desmoldar la canasta, imagino que es más fácil sólo desprender el aluminio.
Y bueno, después de pasar horas pensando en cómo explicar éste proceso, creo que es más fácil que lo entiendan con las fotos. Y si, soy una floja.
Hornea la masa 15 minutos a 180°C, hasta que el pan dore. Debes saber que es muy probable que la parte de arriba (que al armar es la de abajo) dore más que la de abajo (que al armar, es la de arriba).

Extiende la masa con un rodillo y corta tiras largas.

Empieza con tres tiras de base. Si tu bol es más grande, agrega más tiras.

Tiras en medio de las tiras. Aplana el centro con un vaso o algo así.

Ahora, las tiras horizontales van entrelazadas. Si no se pegan bien, ponles un poquito de agua.

Awww, que bello. Barniza con huevo antes de hornear.

Haz dos trenzas. Una para el borde de la canasta, otra para el asa. Olvidé la foto del asa. Sólo coloca la trenza en un bol igual al que usaste para la canasta, para que agarre forma en el horno.

Es importante que el borde de la canasta sobresalga del borde del molde, el pan va a crecer. A mi me quedó chico y siento que se ve un poco extraño.
Al final, las partes se unen con palillos.
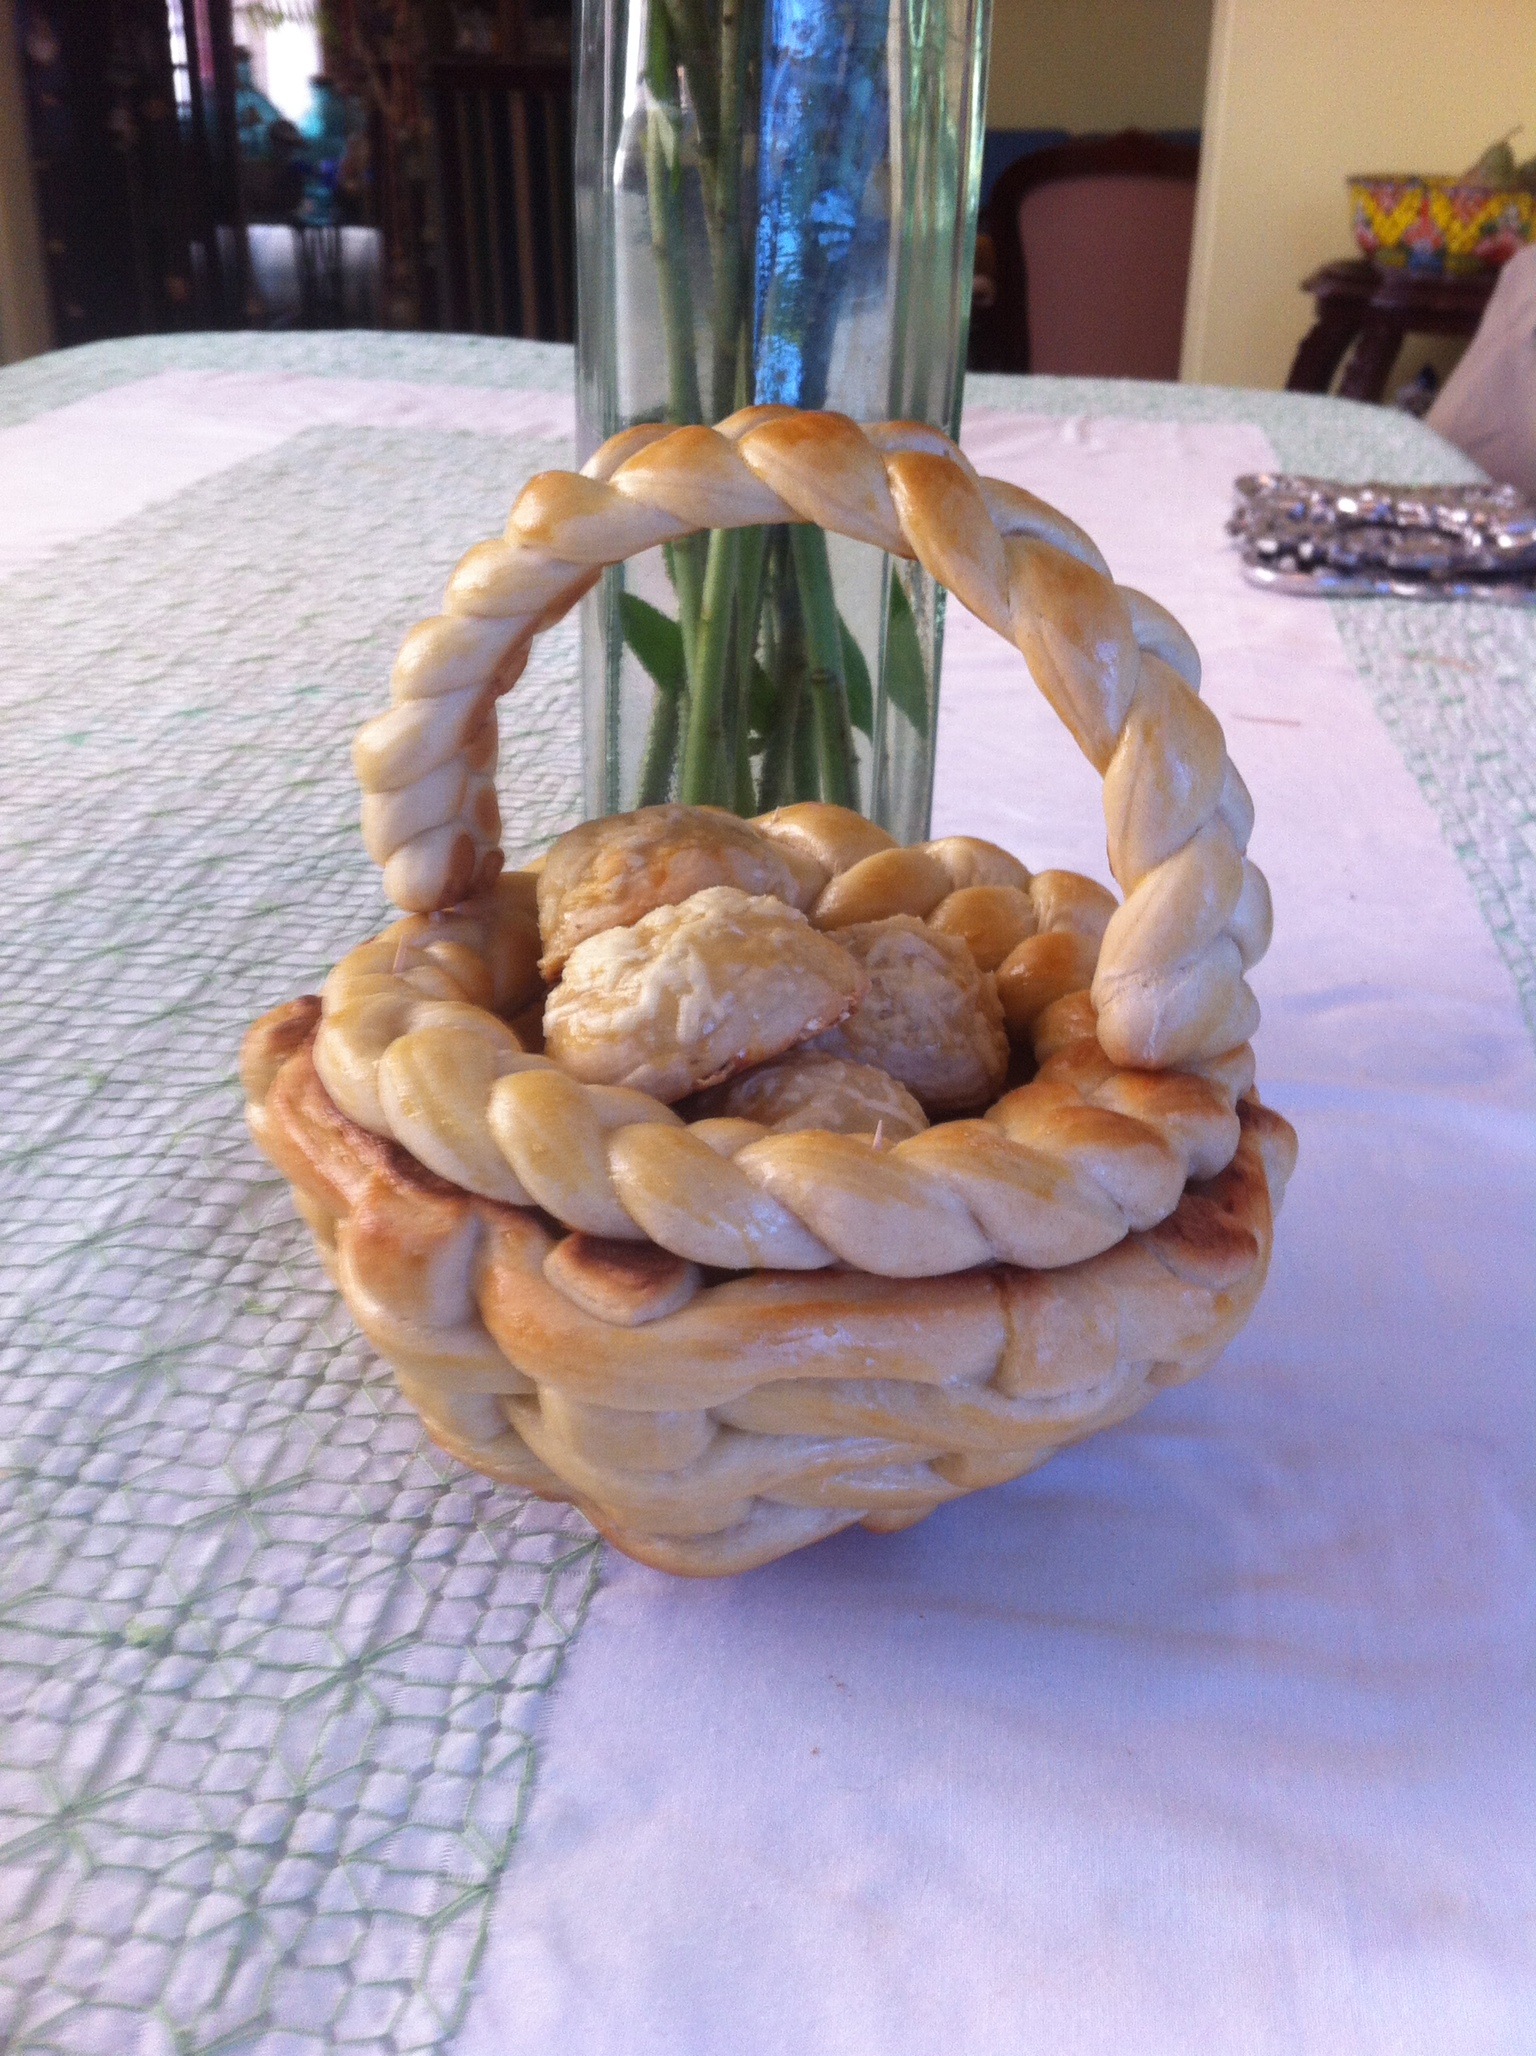
Bien. Ahora que ya tienes una canasta muy bella y comestible, puedes llenarla con un queso que se vea caro, un salami que también se vea caro, y una de esas micro botellitas de vino de 180 mililitros, y regalársela a alguien. Te verás muy bien. Y, como la canasta es barata de hacer (en especial si eres codo y sustituyes el aceite de oliva por aceite de maíz o algo así), puedes invertir más en lo que sea que la vayas a rellenar. Yo la rellené de panes. Oh si. Es una canasta de panes hecha de pan.

De cerca, para que se vea épica.

En el comedor, obvio.

Épico, épico mil.
A bread basket
The story behind this post is quite simple. Browsing Pinterest a Few days ago, I found a 25 gift basket ideas post,and well, even thought I didn’t really love those gift basket ideas, it really made me want to give someone a gift basket. The only problem is the basket itself. I don’t have a job, and I only have the money my parents give me, so I’m not buying a basket. It’s way cheaper to make one out of flour.
This recipe’s out of Namiotl. This is a translation of the original post, which is in Polish… I think. Now, I don’t know about you, but I don’t speak Polish. So, unless you’re really interested, I’d stick with the recipe in this blog, because the original is Google translated, and it’s kind of a bad translation.
This is the original image.
You can make this dough by hand or in an electric mixer. I make mine by mixer because this bread baking thing is not exactly my strongest skill. I wish it was, though.
Bread basket
Ingredientes
- 4 cups of flour
- 1 egg
- 1 Tablespoon active dry yeast
- 1/2 cup lukewarm water
- 1/2 cup milk
- 1/4 cup sugar
- 1/4 cup olive oil
- 1 egg to brush the top
- 1/2 teaspoon salt
Instructions
1.- Mix a tablespoon of the sugar in the water, disolve and add the yeast, set aside for a couple minutes.
Water must be 30-60°C. If it’s colder, the yeast won’t activate. If it’s warmer, the yeast will die. Here’s a tip for you if you touch the water and it hurts at any point, it’s too hot, even if you have to linger a while. And well, if it feels cold… then it’s cold.
This is how yeast looks when it’s activated ^u^
2.- Mix the rest of the sugar with salt and flour.
3.- Add the yeast mixture and combine.
4.- Add the egg and the milk.
5.- Mix in the olive oil and knead the dough for a few minutes, until it’s smooth.
Now, if this was any other bread, I’d recomend adding more milk, (or whatever liquid was being used) so the dough would be as hydrated as possible, but in this case, the dough must be a little bit dyer, so the basket will have more consistency to it.
6.- Brush a bowl with olive oil and put in the dough. Cover the top of the dough with oil so it won’t form a crust. Leave the dough in a warm place whith no air currents to rest until it’s doubled in volume (1 or 2 hours). You can leave it in the microwave or the oven (off, oviously).
First -.-
Later :O
Oh yeah. Now comes the fun part.
First of all, in the original post, they use an oven safe glass bowl. They’re made out of Pyrex. You can cover it with aluminum foil and use safely, but, of course, I’m such a smarty-pants I used one of the half sphere Wilton molds, greased and floured. If you ask me, the glass bowl is a better idea. When you have to unmold it, I imagine its much easier to just peel off the aluminum foil.
And well, after hours upon hours of thinking how to explain this proceidure to you, I decided the pictures are way clearer. And yes, I’m lazy.
Bake this dough at 180°C or 350°F, Until the bread is golden brown. You must know that the top part (which will be the bottom when put together) will brown more than the bottom part (which will be the top when put together).
Roll out the dough with a rolling pin and cut strips.
Start with three base strips. If your bowl is bigger, add more strips.
Strips in the middle of the other strips. Flatten the top with a glass or something.
Now, the horizontal strips go entretwined. If they refuse to stick, use a little water.
Awww, how cute. Brush it with your egg before baking.
Make two braids, one for the border of the basket and one for the handle. I forgot to take a picture of the handle. Just put your braid on top of a bowl like the one used for the basket, so it will aquire that form in the oven.
It’s important for the dough to be bigger than the edge of the mold. Mine turned out a bit smaller and I think it looks kind of weird.
Then, put it all together using toothipicks.
Well, now you have a beatiful, edible basket, you can fill it up with an expensive looking cheese and an expensive looking salami, and one of those micro 180 mililiter wine bottles and give it to someone. You’ll look really smooth. And, because this thing’s cheap to make (specially if you’re the cheap one and sustitute the olive oil with canola oil or something like that), you can invest more in whatever goes in it. I filled it with bread. Oh yeah. Its a bread basket made out of bread.

Wonderful!